Overview
Using USMT In System Center Configuration Manager (SCCM / ConfigMgr) when performing an Operating System Deployment (OSD) can be a bit of a chore. The built in Task Sequence actions available for capturing and restoring user state only allow you to perform a very basic migration. Most of the time USMT requires quite a bit of tweaking to get right and once you’ve got everything working in a standalone script it can seem like a step backwards when you see the default ConfigMgr capture and restore actions. When using USMT in anger it usually involves:
- Creating a custom XML file for migrating customer-specific application settings
- Creating a custom XML file for migrating user data as per the customer requirements
- Creating a custom config.xml file to fine tune built-in migration settings
These instructions are for ConfigMgr 2012 but they are pretty much identical for ConfigMgr 2007 as well. A state capture and restore is usually done as part of a Operating System Deployment Task Sequence. For the purposes of this walkthrough I’ll be showing a cut down Task Sequence that just captures user state using a ConfigMgr State Migration Point (SMP). Note: I’m also assuming that any custom XML files and a custom config.xml file are copied into the same folder as the USMT package. (For example. USMT\amd64\config.xml and USMT\amd64\CustomData.xml). To see how to create your USMT package see this previous post.
Task Sequence
The Task Sequence actions we are interested in are:
- Request State Store – This allows the client to access the ConfigMgr State Migration Point
- Set OSDMigrateAdditionalCaptureOptions – This sets a special Task Sequence variable to allow the use of custom USMT command line options
- Capture User State – This performs the state capture
- Release State Store – This releases access to the ConfigMgr State Migration point
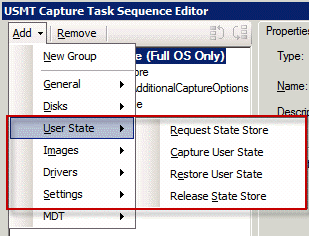
When creating an OSD Task Sequence with User State Migration the Task Sequence automatically includes Request State Store, Capture User State and Release State Store. The Set OSDMigrateAdditionalCaptureOptions is our custom action. The default actions can also be manually created from the User State Task Sequence menu.
OSDMigrateAdditionalCaptureOptions
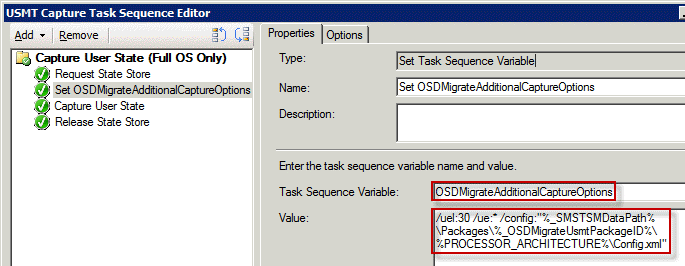
Let’s look at the Set OSDMigrateAdditionalCaptureOptions step first. This is just a standard action that sets a Task Sequence variable.
The OSDMigrateAdditionalCaptureOptions variable allows us to add our own parameters to the scanstate.exe command line when executed. In this example we set the value to the following:
/uel:30 /ue:* /config:"%_SMSTSMDataPath%\Packages\%_OSDMigrateUsmtPackageID%\%PROCESSOR_ARCHITECTURE%\Config.xml"
Those options in more detail:
- /uel:30 /ue:* – Standard scanstate.exe options that mean we exclude local accounts, and we exclude accounts not used in the last 30 days
- /config:”…” – This allows us to specify our custom config.xml file. Unfortunately we must use a full path to the USMT package and config.xml file. The various variables in this allow use to specify the location of the USMT package after it is downloaded to the client so that we can provide a full path to the config.xml file.
- %_SMSTSMDataPath% – Resolves to the root location of the cached package on the client, e.g. C:\_SMSTaskSequence
- %_OSDMigrateUsmtPackageID% – Resolves to the package ID, e.g. AUT00002
- %PROCESSOR_ARCHITECTURE% – Resolves to the build architecture, e.g. amd64 or x86
Capture User State
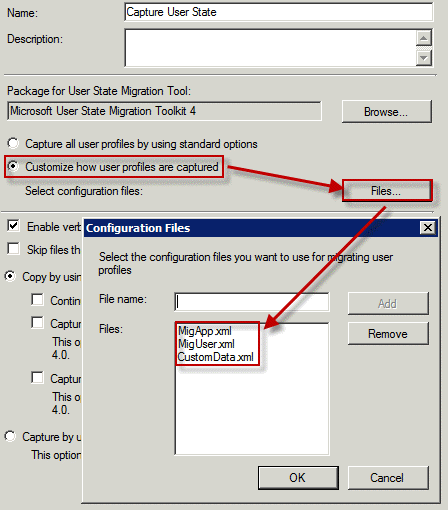
The next step is to use the Capture User State task to specify which migration XML files we want to use. We use the Customize how user profiles are captured option and add the filenames of the migration XML files. In this example I want to use a couple of default USMT files (MigApp.xml and MigUser.xml) along with my own custom XML file (CustomData.xml). These files must be stored in the USMT\amd64 or USMT\x86 folder of the USMT package as appropriate.
And that’s it. This example USMT capture will now use our custom command line switches, custom config.xml, and custom migration files along with the ConfigMgr State Migration Point. I’d also recommend using the verbose logging option in the Capture User State action. This means that a log is produced on the client at C:\Windows\CCM\Logs\scanstate.log. This is very handy when trying to get this procedure to work as one of the first log entries is a summary of the command line options that were used.
The procedure for creating custom Restore User State options is similar except the custom Task Sequence variable name is OSDMigrateAdditionalRestoreOptions and the variable used in this would be %_OSDMigrateUsmtRestorePackageID%.


It is people like you that make me look smart at my job.
In all seriousness, thanks for the post. This is good stuff.
Would anyone know how to add this to the UDI task sequence in MDT 2012. There is no OSDMigrateAdditionalCaptureOptions in the task sequence.
I forgot to add that I am using SCCM 2007 and used these instructions to build and deploy the UDI.
http://www.windows-noob.com/forums/index.php?/topic/5250-using-sccm-2012-rc-in-a-lab-part-18-deploying-a-udi-client-task-sequence-with-mdt-2012-rc1-integrated-in-configuration-manager-2012/page__hl__usmt