Overview
In the UK, we actually get the US version of Windows 7 and Office 2010, so whenever I do any build engineering in either MDT or ConfigMgr one of the first things I need to customize are the regional settings. In particular the keyboard layout and location. There are many ways to achieve this ranging from manually making the change in a reference image or creating an unattend.xml file. In this post I will show how you can set regional settings for Windows 7 at deploy-time using ConfigMgr 2007 OSD and collection variables. This will allow you to automatically have different settings depending on which ConfigMgr collection a machine belongs to. The process shown in this post is for UK settings, but the method will work equally well for any other regional requirements.
Collection Settings
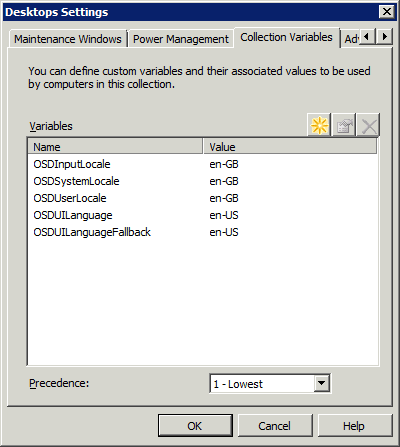
First, on a collection used for OSD deployment select Modify Collection Setttings and goto the Collection Variables tab. Enter the following variables:
- OSDSystemLocale: en-GB
- OSDInputLocale: en-GB
- OSDUserLocale: en-GB
- OSDUILanguage: en-US
- OSDUILanguageFallback: en-US
Note: A common error is trying to use a value of en-GB for the UILanguage – there is no such UI setting, Brits have to make do with American spellings in our Microsoft products… The collection variables should now look like this:

Unattend File
Now create a simple unattend.xml file using the Windows Automated Installation Kit and the Windows System Image Manager tool. You need to:
- Add the component amd64_Microsoft-Windows-International-Core_neutral to the specialize section. (use the x86 component if you are using a 32 bit version of Windows 7)
- Enter the ‘OSD…’ variables we created above in the relevant sections wrapping them with % signs, for example %OSDSystemLocale% for the SystemLocale entry.
When finished it should look something like this:

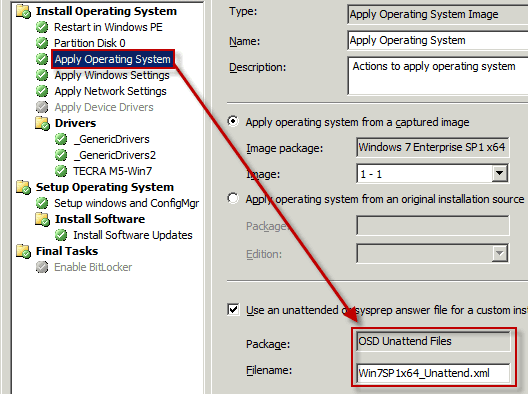
Save the unattend file in a suitable folder (I’m saving it in \\server\ConfigMgr_SWStore$\OSD\Unattend\Win7SP1x64_Unattend.xml – using the folder structure suggested in this post). I tend to put various unattend.xml files for different uses in the same folder then I create a single package for them all for simplified use – in this example I’ll call it OSD Unattend Files.

Task Sequence
The final step is to attach this unattend.xml file to your OSD Task Sequence. Select the Apply Operating System task and enter the package and unattend file name in the Use an unattended or sysprep answer file… boxes:

Now when you use this task sequence the collection variables will be expanded inside the unattend file and voila – per collection regional settings! You can also set these same variables directly on computer objects if you need to specialise for an individual computer.


